

Stuart Batty is visiting Houston during the week of November 13 through 19. Reggie Keith and I will spend two days with him. He will teach several classes and demonstrate for Gulf Coast Woodturners Association (GCWA). He will talk a lot about his 40/40 grind.
The 40/40 grind refers to the signature gouge of Stuart Batty. The wings are swept back at 40 degree to the center line, and the bevel angle is 40 degree all around. If you look at the gouge from the side, it should have a 78-82 degree angle, combining the two 40 degree angles. This is a very versatile gouge in his system.
After initial shaping, he sharpens the gouge free-hand on a platform in one continuous motion. It is easier to do it in two steps, right wing to center, and left wing to center. There is not a commercial jig for sharpening this grind.
The difficult part for most turners is to get the consistent tool rotation when sharpening the wings. I designed the jig to eliminate this problem. When I went to Las Vegas to take his class in September 2016, Stuart asked me to show the jig to everyone in the class.
The jig (shown in the picture) has a dado to fit the diameter of the gouge. A #10 screw is placed at the center of front edge of the dado. This screw stops the rotation of the gouge at the correct angle for sharpening.
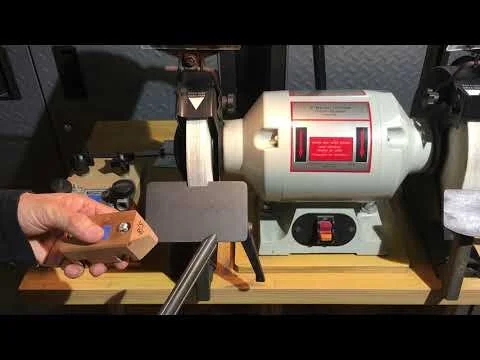
Using the jig is quick and easy. Place the gouge on the grinder platform; hold the gouge in the dado; rotate the tool to a stop; and sharpen one wing. Do the same for the other wing. The center section is tuned by starting at 45 degrees angle on the platform, and rotate the gouge on the platform and along its center line simultaneously. Looking at the profile of the wings from the side, you should see a straight line. This completes one sharpening session. It should only take a few seconds.
Construction of the Jig
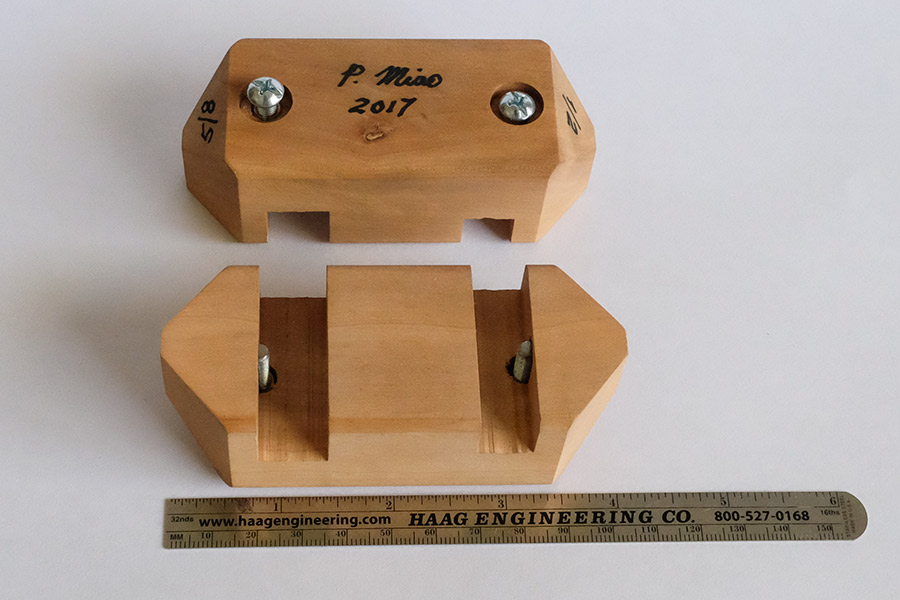
You can make the jig for either one gouge size or two sizes. Woodturners typically put this grind on a 1/2” or 5/8” diameter bowl gouge. The height of dado is the same as the gouge diameter. The thread insert is close to 1/2” tall. I leave 1/8” recess for the screw head. Therefore the minimum height is about 1.25”. The width can be from 1.25” to 1.75” depending on the size of your grinder platform.
1) Mill a piece of straight grain hardwood to 4”(L)x1.25”(H)x1.5”(W)
2) Mark one edge of dado 3/4” from end
3) Drill the hole in the middle of the marked dado edge from top down for the size of your #10 screw insert (I drill a 1/8” deep recess first for screw head, followed by the hole for screw insert)
4) Cut dado for the size of your gouge (the depth is the diameter, and the width is measured when you place the gouge so that one side the flute is parallel to the grinding surface)
5) Cut the symmetrical miter at the end to get a 100 degree triangle (to clear the jig from grinding wheel and to position the jig so that one of the edges is parallel to the grinding surface)
6) Tune the dado to fit your gouge with a round file
7) Install screw insert and adjust the screw against the tool edge until it stops the gouge at the correct position for sharpening (for a V-shape gouge, the wing should be parallel to platform, see photo below; for a parabolic shape gouge, the middle of the wing should be the lowest point on the platform.)

Using the Jig
This grind is typically applied to a bowl gouge with a flute in either a V shape or a parabolic shape. There are two angles on the grind, bevel angle and swept back angle. Bevel angle is determined by the angle of your platform relative to the grinding surface, and should be 40 degrees. When you look at a correctly shaped 40/40 grind from the side of gouge, you should see a straight line. The angle between this line and center line of the gouge is the swept back angle. After you shape the tool, sharpen the tool using the jig in the following steps:
1) To sharpen the right wing, place the tool on platform, hold the tool in the dado of the jig, rotate the tool slightly until the lower edge touches the screw (shown in top photo); move parallel to the grinding surface if it is a V-shape gouge, and rock a little if it is a parabolic shape gouge to get straight edge
2) To sharpen the left wing, mate the jig and tool symmetrically on platform, and do the same as did on the first wing
3) Blend the tip free hand on the platform by swinging the tool from 45 degree left to 45 degree right while rotating the tool simultaneously
This is a fast jig, and gives you consistency.
A Little Secret about the Swept-Back Angle
If you are serious about using this jig or working with this grind, you should be informed. On his gouges with this grind, the bevel angle is 40 degrees, but the swept back angle is less than 40 degrees, somewhere between 36 to 38 degrees. I realized this, because I have to stand at a slightly different position in front of lathe relative to the turning blank when I used his gouge. For once or twice, he actually ground my gouge to a smaller swept back angle. I know that my gouge sweeps back exactly 40 degrees. I think he reached the angle over time for a comfortable standing position, and longer cutting edge. You can vary this angle to your liking; just remember still to call it 40/40 grind.